
Do you know what actually happens inside your septic tank every time you flush? Most property owners couldn’t answer that question until disaster strikes — typically on a holiday when plumbers charge premium rates. Over 15 years spent diagnosing and repairing systems throughout rural communities, I’ve learned that nine out of ten emergency calls stem from problems that were completely avoidable. Knowledge is the difference between routine maintenance and financial catastrophe.
The reality is straightforward: your septic system accomplishes something extraordinary every single day, entirely beneath the surface and out of sight. It purifies household wastewater through a combination of biological activity, gravity’s natural pull, and the treatment capacity of soil. Most of it requires zero electricity. There’s no municipal treatment plant involved. Just a series of carefully balanced physical and biological processes unfolding quietly beneath your yard.
I’m going to break down precisely what transpires from the moment water leaves your house until it’s treated and dispersed. This isn’t just academic curiosity — grasping this sequence will make you a far more informed homeowner. You’ll recognize what deserves protection, which warning signals matter, and exactly when to reach out before a routine $300 pumping becomes an unavoidable $12,000 drainfield reconstruction project.
Understanding Your Septic System: The Complete Picture
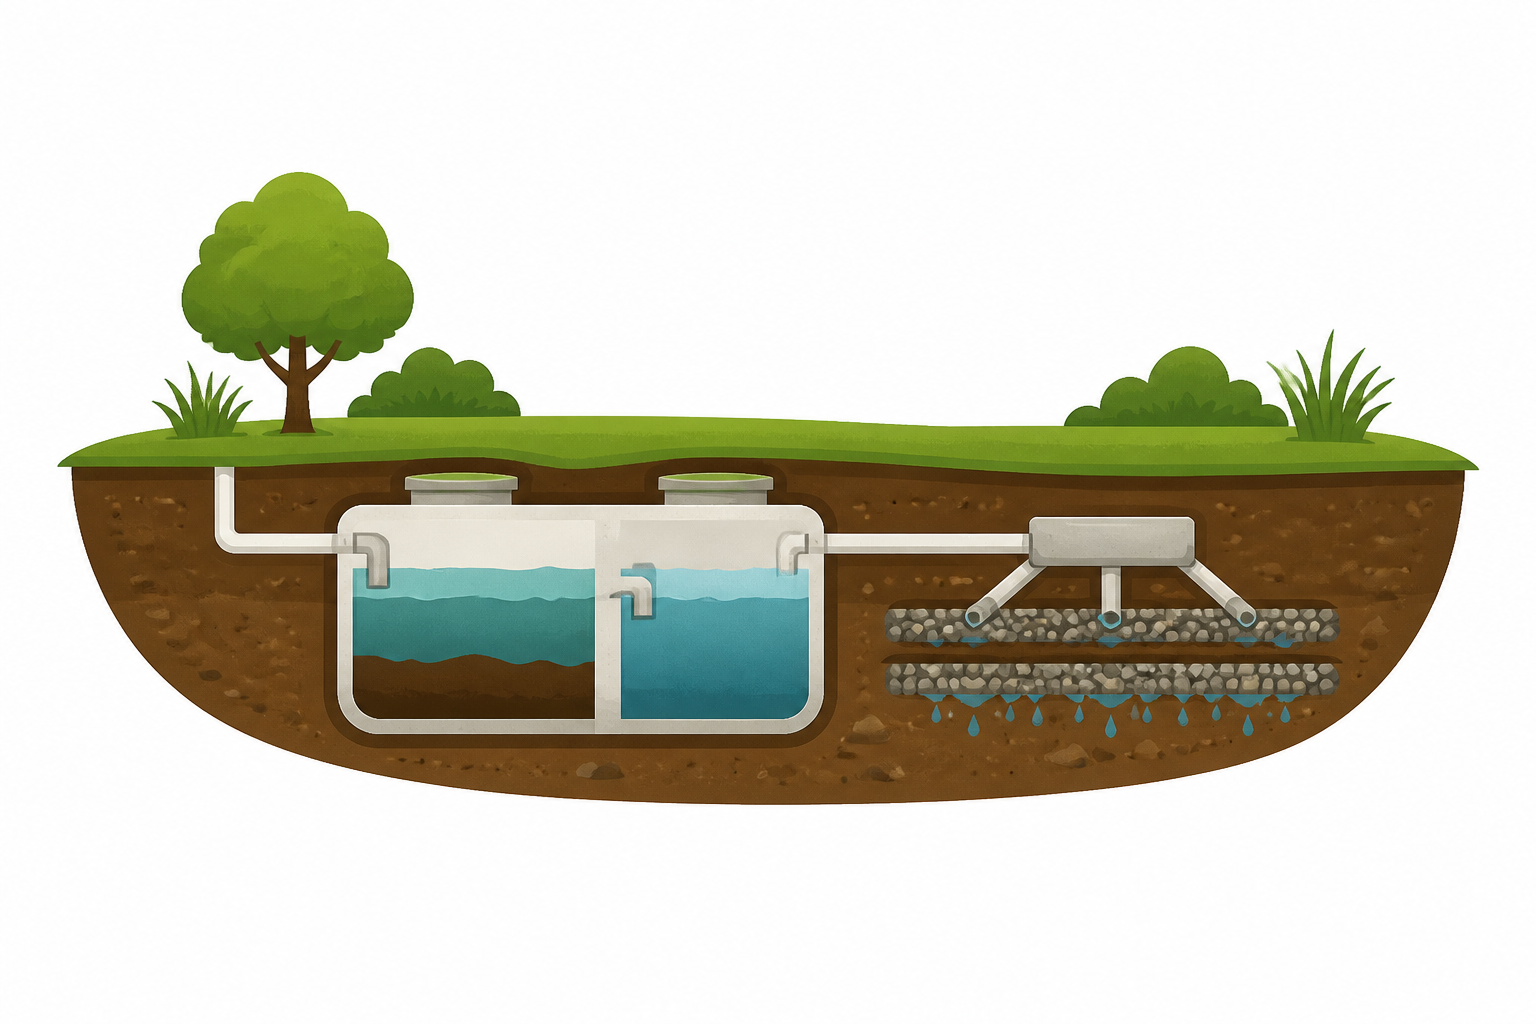
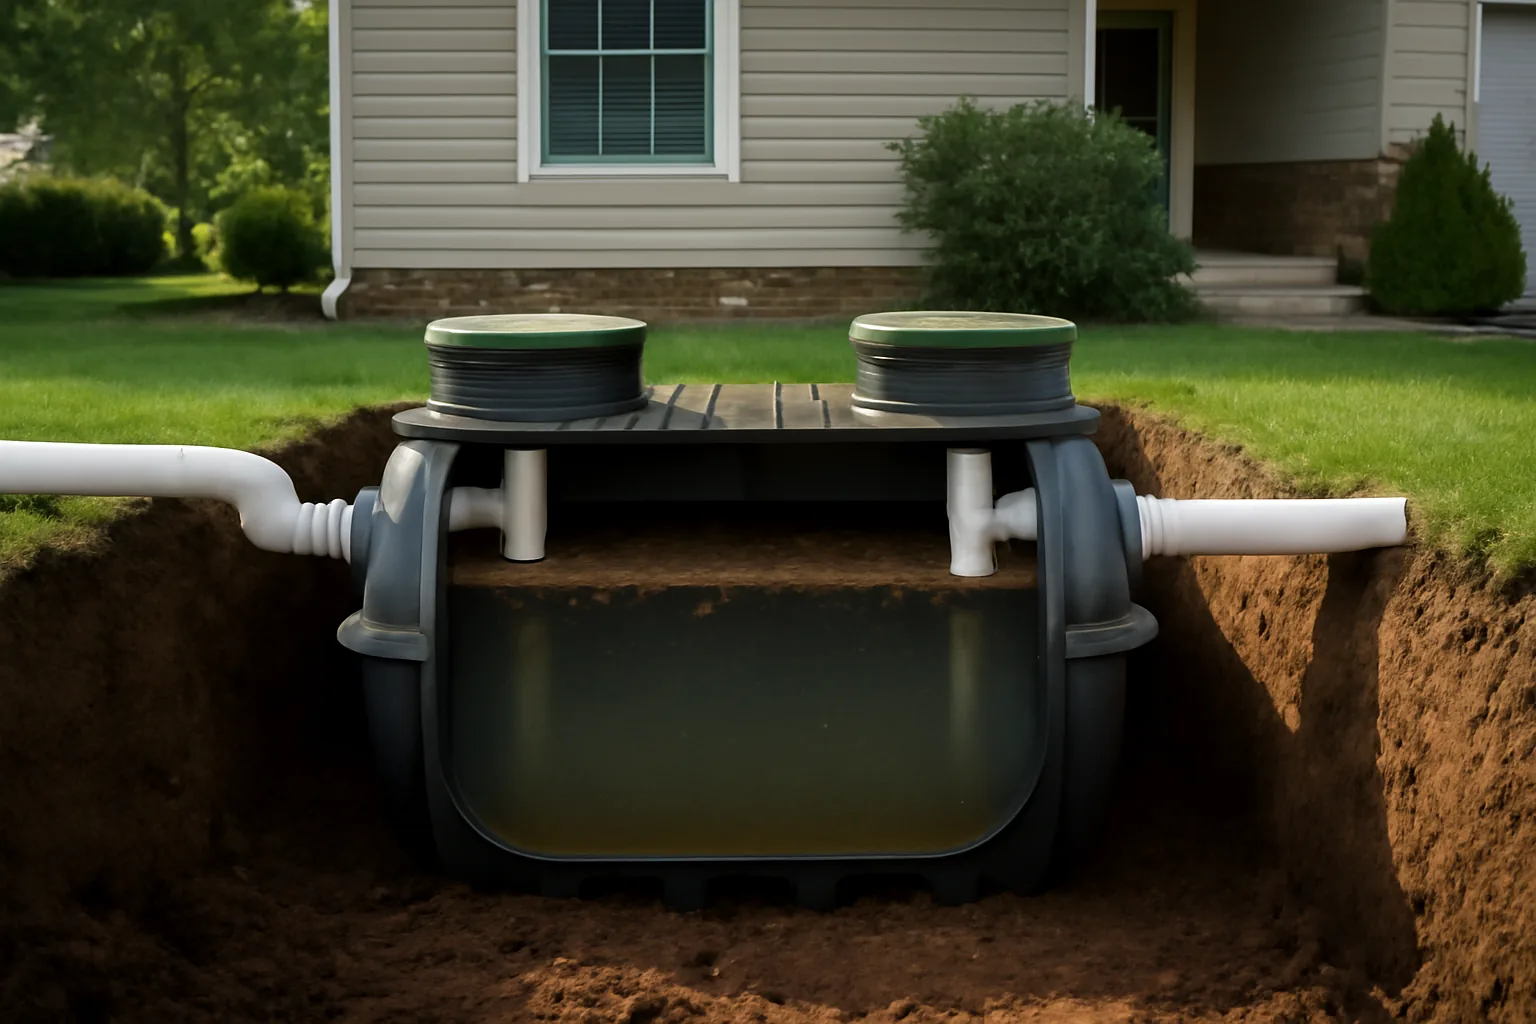
Every conventional septic system consists of two essential sections: a below-ground tank where initial treatment occurs and a drainfield (sometimes referred to as a leach field or soil absorption field) where final treatment happens. All wastewater exits your residence through a single 4-inch main line — sloped downward at 1/4 inch per foot per standard plumbing codes — and descends into the tank via gravity alone. Standard gravity-fed systems don’t need pumps, no moving mechanisms, no electrical hookup.
Three distinct layers develop inside the tank through natural separation. Heavy material descends toward the bottom, accumulating as sludge. Lighter materials like fats, oils, and grease rise upward, forming what’s known as scum. Sandwiched between these layers sits a semi-transparent zone containing liquid called effluent — this is the component that eventually departs the tank. This effluent passes through a dividing structure or discharge pipe and travels onward to the drainfield.
The drainfield operates as a secondary treatment zone. Effluent seeps through pipes with perforations, passes downward through aggregate material, and enters underlying earth strata. Naturally present microbes and bacteria in the upper soil layer — particularly at the biomat interface — neutralize harmful organisms and metabolize excess nutrients. When properly engineered, the water reaching deeper groundwater is surprisingly clean. These components working in concert form the foundation of the system — and each component’s integrity determines the overall health of your installation.
What Happens Inside Your Septic Tank: The Foundation of Treatment
Conventional residential installations typically have capacities ranging from 1,000 to 1,500 gallons. For homes with three bedrooms, nearly all jurisdictional health departments mandate a minimum tank volume of 1,000 gallons — though I personally counsel clients with available resources and suitable acreage to go with 1,250 gallons instead. The extra capacity provides a safety margin on high-volume days, whether that’s Thanksgiving gatherings or weekend visitors.
Two compartments are standard in contemporary tank construction. The primary compartment accepts all incoming effluent and serves as the location where early settling and anaerobic digestion begin. Anaerobic bacteria — organisms functioning in oxygen-free conditions — initiate the decomposition process on solid waste. This biological activity typically reduces the sludge volume by approximately half, though complete elimination never occurs. This fundamental reality explains why regular pumping remains absolutely essential.
The secondary compartment functions as a settling and clarification phase. Material arriving from the primary compartment passes beneath an interior partition, permitting any residual particles to descend before liquid discharge toward the drainfield. Partition walls or discharge pipes — manufactured from either concrete or plastic materials — are absolutely critical structural elements. I’ve inspected numerous tanks where these critical structures had substantially deteriorated. Absence of functioning baffles means particles travel directly into the drainfield instead of settling in the tank. That scenario damages drainfields beyond economic repair, and reconstruction expenses typically fall somewhere between $5,000 and $20,000 depending on regional factors and your soil composition.
Bacterial Activity and System Function
Your tank contains a complex biological community. Trillions of anaerobic microbes labor continuously, decomposing organic matter every hour of every day. Compromising this microbial ecosystem represents one of the most frequent mistakes homeowners commit. A reasonable quantity of antimicrobial cleaners poses no threat. By contrast, introducing bleach directly into the system, operating a food waste grinder excessively, or routinely flushing commercial drain-clearing chemicals can devastate the bacterial population.
I witnessed this firsthand with a customer back in 2017 who maintained obsessively sterilized bathrooms. She relied on industrial-strength disinfectant products for her toilet bowl twice every day and constantly ground food waste. Within three years of her system’s installation, the microbial population had essentially collapsed. Sludge accumulated at extraordinary levels. During the pumping visit, technicians extracted approximately 800 gallons of partially decomposed matter from a 1,000-gallon tank. The bill came to $650 instead of the typical $300–$350 range due to additional time and effort. The takeaway: your bacterial colony functions as essential infrastructure — treat it accordingly.
The Drainfield: Harnessing Soil to Complete Treatment
Homeowners routinely misunderstand the drainfield — it’s simultaneously the least recognized and most costly component of the entire system. Most think of it as merely “underground piping.” In fact, it’s a methodically engineered subsurface treatment facility. Sizing calculations depend on your soil’s absorption capacity, quantified through a percolation measurement expressed in minutes per inch (MPI). A perc examination assesses the velocity of water movement through your particular soil composition.
Loose, granular soils absorb rapidly — occasionally quicker than 5 MPI. Dense clay materials absorb slowly — sometimes requiring more than 60 MPI. Each extreme presents distinct complications. Rapidly absorbing ground doesn’t retain effluent long enough for adequate biological treatment. Slowly absorbing ground causes effluent to accumulate on the surface or back up into the tank. Most state regulatory agencies restrict conventional systems to soils with percolation measurements between 1 and 60 MPI. Outside this window, specialized installations become necessary — elevated systems, pressure-dosed networks, mechanical treatment components — all of which substantially increase expenses.
Excessive water volume represents the primary threat endangering drainfield longevity — overwhelming the soil’s capacity to receive and treat the material. One of my customers encountered a slow toilet valve leak the previous spring. He dismissed it as insignificant. That seemingly minor seepage was discharging an additional 200 gallons each day into his system. Across half a year, this volume had brought his drainfield dangerously near total failure. Fortunately, we identified the issue before irreversible damage occurred. Attend to leaking plumbing fixtures promptly — your drainfield’s remaining lifespan depends on it.
Installing an Access Riser: The Decision That Changed My Inspections
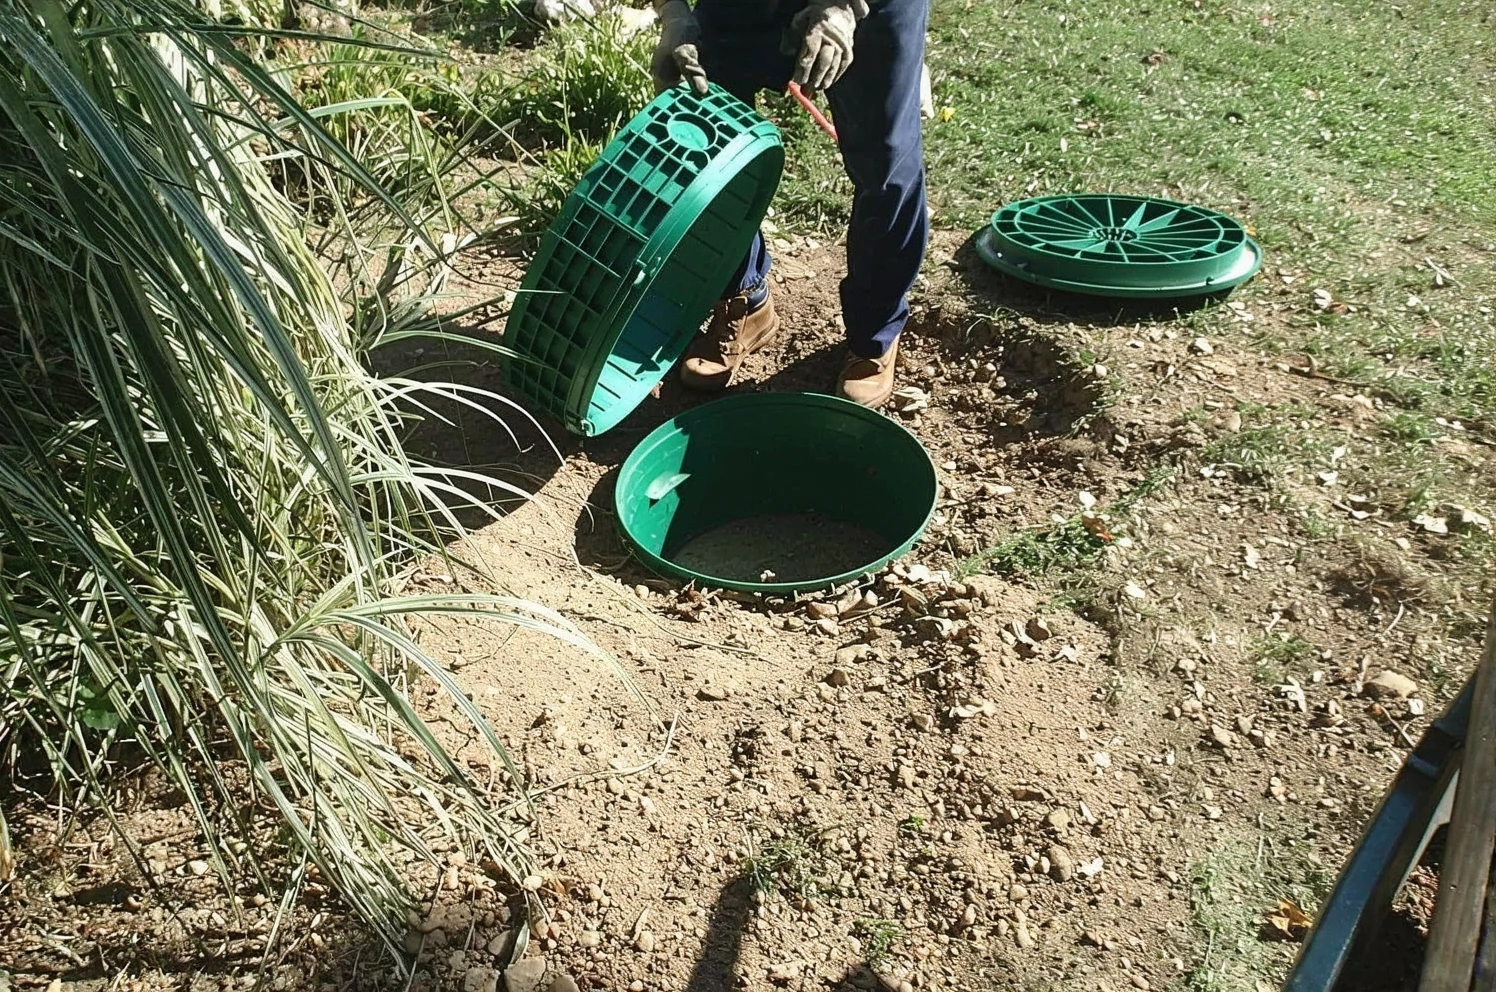
During my earlier years, I made a costly error: avoiding internal tank inspections until visible warning signs appeared. Installing a proper access assembly with a quality lid transformed this approach — suddenly I could examine the tank’s contents annually without requiring concrete demolition or scheduling expensive pump truck visits just for a visual assessment.
The advantages
- Level configuration remains flush with surrounding terrain and avoids catching on equipment or creating stumbling risks that dome-shaped alternatives frequently cause
- Durable materials withstand seasonal stress and remain watertight across multiple seasons instead of fracturing from sun damage or ground heaving
- Unobstructed visibility into tank contents — you observe actual scum thickness and sludge depth and can monitor whether your system is accumulating material appropriately or processing load correctly
The drawbacks
- Adding the riser requires extracting the current lid and potentially some ground disturbance if your present riser dimensions are insufficient
- Standard 24-inch diameter fittings don’t suit all tank configurations — verify your existing opening measurements before ordering
I almost skipped upgrading my lid because the old one “still worked,” but then I couldn’t get it open without breaking a shovel. Grab a Tuf-Tite 24×6 riser and stop gambling on what’s actually happening inside your tank.
This post contains affiliate links. As an Amazon Associate, I earn from qualifying purchases at no extra cost to you.
![Customer photo of [what's shown in the image related to septic systems/product]](https://backyardseptic.com/wp-content/uploads/2026/06/B00JU5YAFM-2.webp)
Tuf-Tite 24×6 riser
I can see into my tank now instead of guessing when it needs pumping.
Check Price on Amazon →