This post contains affiliate links. As an Amazon Associate, I earn from qualifying purchases at no extra cost to you.
I got a call three years ago from a guy in the North Georgia mountains. He’d bought a beautiful 12-acre lot, built a sweet little off-grid cabin on it, and installed what he thought was a perfectly good remote cabin septic system. By the following February, the whole thing had stalled out — frozen inlet pipe, sluggish drainfield, and a tank that hadn’t seen a load heavy enough to keep the bacterial culture alive. He’d spent around $4,200 on that system. It needed a complete redesign. That’s a painful lesson, and it’s one I’ve watched repeat itself more times than I care to count across rural Alabama, Tennessee, and Georgia.
The problem isn’t that remote cabin septic systems are hard to design. The problem is that most installers treat them like a scaled-down version of a full-time residential system. They’re not. Low-use, intermittent-occupancy systems have their own failure modes — freezing, biological stall, and hydraulic slugging chief among them. After 18 years of installing, inspecting, and rescuing these systems across the rural Southeast, I’ve developed a clear playbook for getting it right the first time.
This guide is for cabin owners, owner-builders, and rural property buyers who want to understand the real engineering behind a system that works whether the cabin sits empty for six weeks or gets slammed with a weekend full of guests. I’m going to give you the specifics — measurements, costs, design choices, and a few hard-won mistakes of my own.
Why Low-Use Systems Fail Differently Than Residential Ones
A standard residential septic system is sized for roughly 100–150 gallons per day per bedroom, based on EPA guidelines and most state health department sizing tables. That daily flow keeps the tank’s anaerobic bacterial population fed, maintains proper scum and sludge layers, and pushes effluent through the drainfield at a pace the soil can absorb steadily. When you drop to weekend-only or seasonal use, all of that balance breaks down.
Here’s what actually happens in a stalled system. The bacterial colony in the tank starts dying off during long idle periods. When you arrive Friday night and flush a full weekend’s worth of waste in 48 hours, raw, incompletely treated effluent hits the drainfield. Over time, that inconsistent loading causes biomat buildup — a thick, black, gelatinous layer that clogs the soil interface. I’ve dug up drainfields on cabins that were only three years old and found biomat so thick you could cut it with a shovel. That’s a $6,000–$12,000 drainfield replacement depending on site conditions in the Southeast.
Freezing is the other major villain. Inlet and outlet pipes that sit dry for weeks lose the warm effluent flow that prevents ice formation. In North Carolina and Tennessee hill country, I’ve seen 4-inch PVC inlet pipes freeze solid in January because the cabin sat empty through December. That single failure can crack fittings, heave baffles, and back sewage up into the cabin floor drain. Prevention is far cheaper than the repair.
Sizing and Tank Selection for Intermittent Use
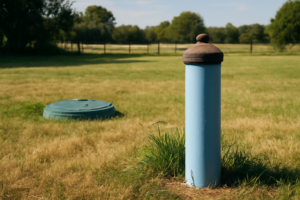
My first rule for any remote cabin septic system design: oversize the tank. A full-time two-bedroom home in Georgia might get a 1,000-gallon tank under the state’s minimum code requirements. For a two-bedroom cabin with weekend-only or seasonal use, I install a 1,500-gallon tank at minimum — and I often go to 1,250 gallons even for a one-bedroom if the terrain allows easy access. The extra capacity buffers the surge loading from weekend guests and gives the bacterial population more stable conditions during idle periods.
Tank material matters more in remote installations than people realize. Concrete tanks are my preference for anything in the rural Southeast because they’re heavy enough to resist flotation in high-water-table sites and they hold temperature better than plastic. However, on steep mountain sites where trucking in a 10,000-pound precast tank is either impossible or prohibitively expensive — I’ve quoted $800–$1,400 just for crane and transport on difficult terrain — a high-density polyethylene (HDPE) tank with proper ballasting and anchor straps is a legitimate option. Always confirm your tank selection meets your county health department’s approved products list before you pour a single dollar into the ground.
Effluent filters are non-negotiable on low-use systems. I install a Zabel A1800 or equivalent on every outlet baffle. These $45–$75 filters catch solids that wouldn’t normally leave the tank in a properly loaded residential system but absolutely will escape during the biological stall-and-surge cycle of cabin use. Cleaning the filter twice a year takes five minutes. Replacing a clogged drainfield takes five days and costs a fortune.
Concrete vs. Plastic Tanks: A Quick Comparison
- Concrete: Heavier, better thermal mass, longer lifespan (40–50 years), harder to deliver to steep sites, cost $900–$1,500 installed in most rural SE counties
- HDPE plastic: Lighter, easier transport, more flexible on rough terrain, requires anchor straps in high-water-table areas, cost $700–$1,100 installed
- Fiberglass: Less common in the Southeast, good corrosion resistance, moderate weight, cost $850–$1,300 installed
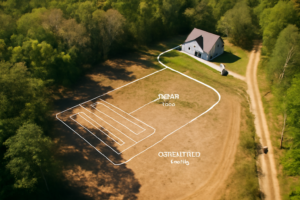
Drainfield Design: Protecting the Soil When Flow Is Irregular
Standard drainfield sizing in most Southeastern states runs 25–45 linear feet of trench per bedroom, depending on soil percolation rates from a perc test. For cabin systems, I add a 25–30% buffer on top of that minimum. My reasoning is straightforward: the soil treatment zone needs to handle surge loading from a full house on a holiday weekend, not just the daily average that sizing tables assume. Adding trench footage is cheap insurance compared to a replacement.
Trench depth and gravel specs matter too. I run 12 inches of washed stone under perforated pipe in a 36-inch-wide trench for most installations, which meets or exceeds Georgia EPD and Tennessee DOE guidelines. In heavy clay soils — and there’s plenty of that in the Piedmont region — I’ll sometimes recommend a pressure-dosed system over a conventional gravity drainfield. Pressure dosing distributes effluent evenly across the entire field rather than saturating the inlet end first. That even distribution dramatically reduces biomat risk in low-use scenarios.
The first time I saw a truly failed biomat situation up close was on a weekend hunting cabin in rural Alabama, about eight years into my career. The owner had used it maybe 30 weekends a year for five years. The drainfield looked perfectly normal from the surface. But when I excavated a test pit at the 18-inch depth, the soil interface was completely black and sealed. No hydraulic conductivity at all. That system cost $9,800 to replace. I learned then that biomat prevention has to be baked into the original design — you can’t retrofit your way out of it easily.
Considering Alternative Drainfield Systems
For very remote sites with poor perc, limited lot area, or high seasonal water tables, I’ve had good results with drip irrigation systems and gravelless chambers like the Infiltrator Quick4 series. The Infiltrator chambers provide roughly 22 square feet of soil contact per unit and are approved in most Southeastern states. They’re also easier to deliver on rough terrain than bulk gravel. That said, alternative systems almost always require a more capable septic contractor and a state-approved engineered design — this isn’t a DIY project path.
Freeze Prevention Strategies That Actually Work in the Field
Freezing is the failure mode that surprises cabin owners the most, especially in the Mid-South and Upper South where hard freezes are seasonal but not constant. Here’s what I’ve learned works reliably. First, bury your inlet and outlet pipes at a consistent 4-inch drop per foot of run, minimum, and keep the total run as short as possible. Long, shallow pipe runs are freeze disasters waiting to happen. When I design a cabin installation, I try to keep the building-to-tank run under 20 feet whenever the site allows it.
Insulation is your best tool for unoccupied periods. I use 2-inch rigid foam board (R-10) over inlet and outlet risers on any cabin in a zone that sees sustained temperatures below 20°F. Geotextile fabric over the drainfield trenches — a technique I picked up from a Tennessee health department inspector years ago — adds meaningful insulation and protects against frost penetration. This adds maybe $150–$250 in materials to a typical installation. It has saved several of my clients from burst fittings and cracked baffles.
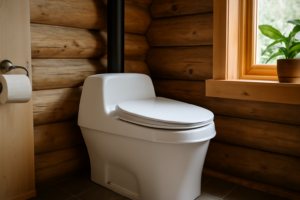
For cabins that go truly dark in winter — no heat, no flow, no drips — I always recommend a winterization protocol. That means flushing all fixtures, adding a cup of RV antifreeze (propylene glycol, not ethylene glycol — the ethylene formulas can harm your bacterial population) to every P-trap, and adding a small amount of a bacterial additive to the tank before closing up. I learned this the hard way on my own camp property in 2011. I skipped the antifreeze step on the toilet’s fill line. Cracked fill valve, flooded bathroom, and a very unpleasant spring opening. Never again.
The Manual That Taught Me Why Remote Cabins Fail Where Suburban Systems Thrive
Low-use septic systems live by different rules than year-round homes, and I didn’t understand those rules until I’d already made expensive mistakes. This manual breaks down the actual biology and hydraulics of infrequently-used tanks—why they stall, freeze, and develop the exact problems that caught that North Georgia cabin owner off guard.
What works
- Explains the difference between design loading for seasonal vs. continuous-use systems—critical info I couldn’t find in any online forum
- Covers freeze protection, tank stratification, and bacterial die-off in low-flow conditions with specific maintenance intervals that actually prevent winter failures
- Includes troubleshooting flowcharts that help you diagnose stalled systems before they become full replacements
What doesn’t
- Doesn’t include site-specific design calculations—you’ll still need a professional engineer for actual sizing, but this manual tells you what questions to ask
- Written for broader audiences, so you’ll skim past suburban-system chapters to find the low-use insights buried in the appendices
I second-guessed buying a “manual” when I could find articles online, but those articles never explained why my tank wasn’t producing enough activity to process solids—this book did, and it saved me from repeating that guy’s February nightmare. Grab The Septic System Owner’s Manual before your first winter.
This post contains affiliate links. As an Amazon Associate, I earn from qualifying purchases at no extra cost to you.